Archive | 2014

Harrogate Power Tool Show.

A few photos from the Harrogate Power Tool Show, it is a show I enjoy immensely. It often seems that Greenwood workers view power tool users with suspicion and vice versa and I don’t deny I get great pleasure from wheeling large logs into the event then spending three days reducing them to bowls with only hand tools. I was next to a CNC carving stand, you scan or program your design into a Laptool and the software drives a mill that does the carving for you. However there is never any hint of animosity or friction and I had a fantastic time, my only regret was that I did the three days by myself and didn’t have time to go around the show properly, not many photos either. Here is the poplar bowl I roughed out over the three days.

chippings

When I cut scalloped the ends of the bowl with an axe I was amazed to find the the chipping came away almost intact despite it being endgrain, here is a section.

ultimate woodchip

Generally though all the work was done with adzes, I used a two handed one for the roughing it was surprisingly quick to do this way, and I had time to put a handle on a lighter adze that was then used for finer shaping although the finishing cuts will be done after it has dried. The one in the picture is a bit of a beast at 1.3kg ; I use much heavier hammers but for an adze this seems to be right at the limit of what I can use comfortably single handed.

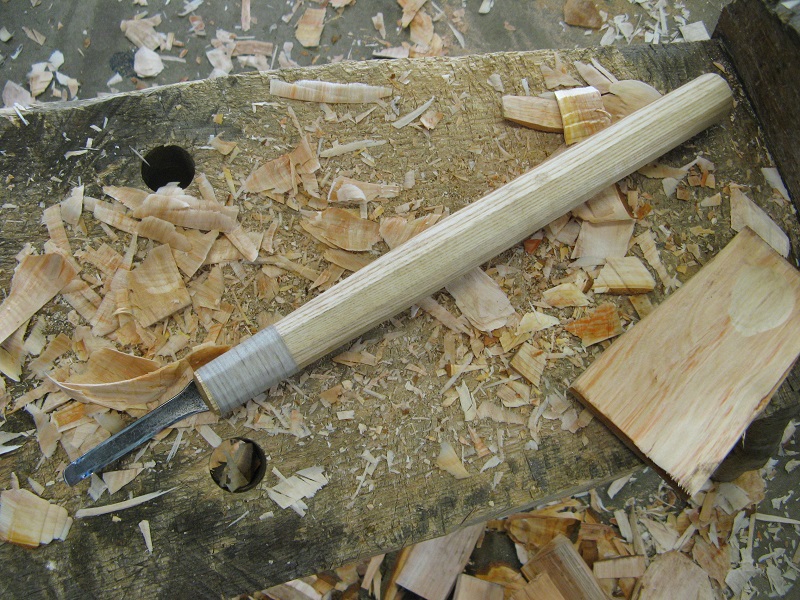
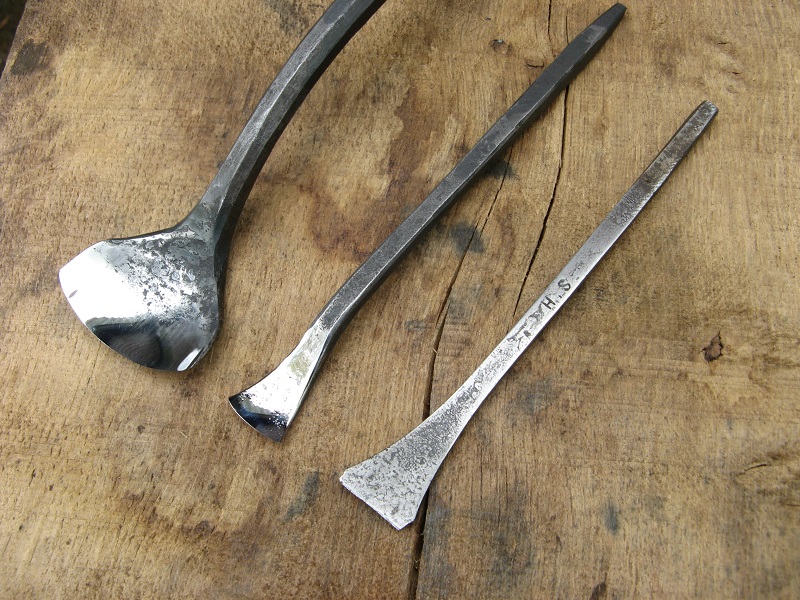
I also had time to finish off and fit the handles on a set of Gouges that I have been wanting to make for a while, hopefully they will prove strong enough to be struck, although increasingly I am being won over by adzes, I can’t imaging using gouges to remove large quantities of material any more.

Ibbc gouges

And finally, on the first day, before I had started the Sales director from the Robert Sorby stand came over, and said that I should really watch these great videos on carving that he has seen on you tube, apparently there is a guy in America that carves bowls and cups just with handtools, Alexander Yerks, it is a small world.

International Bowl Carving Conference ’14

A few weeks back I invited a few friends over to carve some bowls from the large poplar that I currently have access to,  I had forged some tools that needed handling and then testing. We started with this log, it had the potential to give a bowl of 22″ across.

Big tools


The first cut revealed some very interesting looking figuring.

Cut


This was then split and a circle drawn on; we made circular bowls, however on reflection I think one reason to carve rather than turn a bowl is the freedom to make a shape other than round.

circle


We shaped the inside first, the weight of the blanks made clamping unnecessary, Steve had brought an specially ground axe that he used to great effect for both the inside and outside of he bowls, the technique at first seemed odd, as he was trying to break chips away; this looked like he was miss hitting and as I spend a lot of time in my forge trying to ensure accurate square strokes I have to say I found it slightly disturbing despite it being obviously effective. The clincher to my absolute condemnation of this technique is that the workshop is still sullied despite three sessions to clear up the chips he fired far and wide so effectively.

I put a longer handle on my heaviest adze head and this proved pretty effective at both the inside and outside of the bowl.

P1010778


Obligatory fruit shot.


P1010763


We also went trophy hunting.

Trophy hunters


Steve put a larger handle on his GB adze, I tidied up the bevels a bit on my linisher.


P1010785


I didn’t get much bowl carving done, but did manage to fine tune these adzes.

P1010794

So a great few days; I learnt a massive amount just watching; found out some very interesting things about adzes- which will be the subject of my next blog post. Didn’t have the time to try out the big axes, but the week after I did set aside the time to carve a large (round!) bowl,  it is now drying and I will be forging and trying out new tools to finish the inside. Anja Sunberg sent me some images of Swedish style scorps that look intriguing, or maybe some specially shaped gouges, if I can justify the time, both.

Knife handle making – using dowel

I have been trialling this method of knife handle making for a while now, the dowels will be for sale on the site soon but for the moment any Sloyd ( small/ standard/ laminated)  blade will come with one for free. The straight edged blade is another pattern that I used to make that may well make an appearance on the site. I would advise taping up the blade for safety, I haven’t for clarity.

1

I make them in a couple of sizes, a smaller dowel still will be needed for my detail blades, still working on those. This is the sort of fit that we are after. It is possible that the slot might be a bit tight on some blades. My approach ion the workshop would be to grind the tang down to fit, but another option is to sand or carve down the inside of the slot until the blade goes in without spreading the arms of the dowel.


2

Drill a suitable hole, 10mm in this case, in an oversized piece of wood, I used cherry. You want a few mm protruding from the handle at this stage. If the dowel gets stuck you can put the blade in and rotate and whilst gently pulling. Check that the blade is roughly in line with the handle, if it isn’t try rotating the blade or dowel, if this doesn’t help then your hole isn’t straight and you need to start again. When you are happy with the alignment mark the blade and dowel so they will go back the same way ( I know that if the tang was perfectly straight and the slot centralised this wouldn’t be necessary, but it doesn’t hurt)

3

When you are happy with the fit, glue the dowel in place, use enough epoxy to get a good joint but not so much that it fills the slot for the blade. Wedge the end of the dowel open with a scrap of wood, best to make it narrower than the dowel or it might get glued to the sides of the hole.

4

Sand down the tang of the blade, this will make a better key for the epoxy. You can see that the shoulders on the blade are not aligned, the shoulder at the spine needs to be recessed into the handle, leaving the edge shoulder will be slightly proud.

4.5

When the glue is set the blade is held in a soft jawed vice ( or a standard vice and the blade wrapped in cardboard. The handle is hammered onto the tang, it should only be a tight fit as the shoulder is being driven in, if it is tight earlier on then it is possible some epoxy has got into the slot; heat the tang gently over a flame and try again the epoxy should soften enough to allow you to get the blade in, it will grab as it cools, so pull it out and and sand off any epoxy stuck to the blade. You should end up with a flush shoulder like this, the handle is left oversize to reduce the chance of it splitting, but if you are worried you could remove some of the wood with a needle file or alike.

5

Check the alignment of the tang, and mark the centre lines of the blade.

6

Pull the blade out, if it is stuck you can hammer carefully on the front face of the handle whilst holding the blade in the vice. I then roughed out with an axe, using the x as the centre for the butt of the handle.

7

I then shape finally with a knife including both ends of the handle, and give the handle a coat of oil to stop the glue staining the wood. Then run some epoxy into the slot, let it settle to the bottom , push the blade in and ideally you should see epoxy drive out of the slot just as the blade goes up to the shoulder, if glue comes out too early I pull the blade out and wipe some epoxy off the tang and try again. If there isn’t enough I either add more to the slot or if it is nearly there run a bit into the gaps down the sides. Wipe with a tissue to get a neat fillet. The woods don’t match that well in this case, but the joint is sound.

8


9

Carving The Diet Spoon

A little tongue in cheek photo story:

An unhealthy snack tempts the unwary.

Potnoodle spoon

Not a very good picture, but as most people know Potnoodles are better eaten after dark, the spoon is unused and you will have to take my word that although there is decoration in the bowl it is flat.

Stirrin

Add hot water, stir, leave two minutes then stir again.

post stirrin

better image in daylight.

spikes


Mouth feel is ruined, plus the spikes grip the ‘food’ , so eating is difficult and unpleasant- the perfect diet spoon!

Actually this is a spoon carving technique I first saw applied to a carved toad, the characteristic warts were formed in the same way,  this is rather fun but not useful application. Plans are afoot for a more sensible version.


New Stock of Carving tools

New old stock

With the last outdoor show of the season done and stock on my site built up  I was able to make some tentative runs on the tools shown above , nothing really new but a few little tweaks and some older designs that customers have been consistently asking to be put back in production, hopefully I will be able to keep up, although I expect the run up to Christmas to be testing.

I spent some time today photographing these carving tools for adding to the website, something I find a real chore. They have just gone up on the site, it really has been a hectic summer, I even uncovered a small cache of skew chisels made in May that were never uploaded.

Planning on forging axes and adzes this coming week, a couple of larger ones for me to try out on some Poplar that looks like it could make superb bowls, then a concerted effort to make inroads into my axe and adze order list.

Poplar

Cygnet handle

Another tutorial on making and fitting a Cygnet handle, on my smallest bowl gouge, the Cygnet. This does not come with a ferule as the shorter length and handle means that extra reinforcement is not needed, it also means there is less chance of the tool bruising the wood you are working on.

My starting point was a gouge I forged as a demo at Bodgers Ball; not quite the same as my production ones ( on reflection this sounds rather grandiose to me, I still forge them all by hand and eye) however the principles are the same. I chose an oversized piece of dry cherry for the handle. I would recommend taping up the blade for safety and to protect the edge, but haven’t in this sequence for clarity.

Cygnet 1

I then  measured the length of the tang and diagonally across the corners. I  Drilled a hole in two stages ( diameters) that was fractionally longer than the tang and matched the taper on the tang; The tang dropped in this far:

Cygnet 2

Next the brutal bit; I held the gouge in the vice and hammered the tang flush to the shoulders. Padded vice jaws would have been preferable.

Cygnet 3


Then I marked the centre line of the gouge to be certain that the handle would line up with the gouge when it was finally fitted together.

Cygnet 4

The Cygnet handle was tapped off and roughed to size with an axe, using the cross as a reference for the butt of the handle.  When driving the tang in for the first time I leave a lot of excess wood around the hole to reduce the likelihood of spitting, but once the shoulders of the tang have been set in it is safe to take it down quite fine.

Cygnet 5


I tend to rough to octagonal with the axe but finish to 12 sides with a knife, this seems like a nice balance between facets that are crisp but not too sharp. The butt should be left pretty smooth though to reduce the onset of blisters, I then oil the handle trying not to get any inside the hole.

Cygnet 6

Here you can see how the mismatched shoulders have been driven into the wood, this was not a very good forging, current gouges have much more even shoulders, however when it is all glued up it won’t show. Note the tang has been roughened with coarse paper.

Cygnet 7


Epoxy is run into the tang hole, allowed to settle at the bottom then the tang is inserted. A small amount of glue should be driven out of the hole, the amount shown is about right when the tang is pushed home fully- this is quite easy as the glue lubricates everything , if it looks like to much is going to come out, take out the tang, wipe the glue of it and reinsert. Wipe of the excess glue from the handle and when the glue is set apply another coat of oil. Pre oiling the handle ensures that the epoxy won’t stain the wood.

Cygnet 8


Bowl Knife Handle making

A quick tutorial as to how I fit the handle on a bowl knife;  there are lots of ways to do it and a couple of jubilee clips would do fine, but I like the finish this method gives. It is a bit over the top though, very much belts and braces.

Starting point in this case was cleft dry ash, I left facets on for better grip.

cleft handle

I draw around the blade.

marked out

I cut a rebate for so the blade is inlet flush with the handle.  I found a chisel easiest for this job.

Inlet

I then screwed the blade in place, notice proper slot head screws, I have a stash of these but they are increasingly hard to find.

screwed

I then took it apart, epoxied everything in place.

screwed and glued

When it was set I gave it a quick sand to remove any high spots and started the whipping. First cut off 6″ of thread and put it to one side, you will need it later. It  is a bit fiddly to get catch the loose end, you also don’t want to start to close to the end of the handle. Once you have got a good start of 4 or 5 wraps you can cut the tag end down.

catching the end

I only had very fine cotton so it took a while to  reach the end of the blade,  I then whipped in a loop of the material I had put to one side earlier. after 4 or 5 wraps cut your thread and pass it through this loop, pull on the two ends and your whipping will pass under the  earlier threads, cut the end flush with a knife between the wraps.

catching the other end

I then added a thin layer of epoxy as I was concerned that if the thread frayed it would all unravel. Also want to make sure the thread didn’t come of the front of the tool. The epoxy soaked in and didn’t leave a glossy finish. A coat of oil to seal the wood and it was ready to use.

finished 2

What I do like about this method is that the fixing is very low profile and so less likely to foul on the inside of a bowl in use.


Chisels and Gouges

About 18 months ago I read a great article in Woodcarving Magazine, Michael Painter was discussing the design of tracery chisels, they looked interesting and I learnt a lot about their design . Using the principles he described I came up with my swan necked bowl gouges. They are a tool I am especially proud of as they are so different to the bowl gouges that other makers offer. One of the reasons I called them Swan necked is that I find these tools graceful and current alternatives are known as doglegs, which, well, aren’t.

I met Michael at a show earlier in the year and started describing the bowl gouges I had made; he firmly corrected me saying they were chisels not gouges  ( my view is that if I made the tool I can call it what I want, but thought it better to bite my tongue. )   he looked skeptical but I produced said tool and he was quite impressed, showing me the original tracery chisel that I had seen in the article he wrote. I took some measurements and we also discussed making some fishtail chisels. I enjoy trying something new and this was the result.

fishtail and tracery 1

The day I finished this set I had a phone call from a customer that had bought a bowl gouge from me asking  if I could make fishtail chisels, he sent an old one down that he had snapped the corners off- not all old tools were made from from perfectly tempered steel obviously.

When it arrived the next day it was interesting to compare  it to my new tracery chisel and the greenwood swan neck.

bowl gouge origins 2

They may look very different but the techniques to make them were identical,  shape and scale varied but it showed me how closely related the different branches of carving actually are.

I have been wanting to make a one handed version of my gouges, the same wide blade and sweep but more compact neck and handle. Here is the first attempt, it still needs more testing and tweaking but first impressions are good. But the part that really makes me happy is that I get it name it the Cygnet.

gouge

Yandles spring show and Lie-Nielsen

Yandles was as ever a great show; a  unique atmosphere, I enjoy the fact that it is not aimed at green woodworking; there are a few of us demonstrating but the power tools are definitely king here; however we draw a good crowd, and find ourselves made very welcome. I am increasingly finding more in common with other branches of woodworking, the idea that there is conflict between different disciplines of woodworking is a shame, I really enjoy seeing different ways of working wood.

Rob and I set to work forging the first axe of the year. Rob was not impressed with my new sledge and stuck with last years model.

IMG_6759

The show was also a  chance to  meet up with old friends including the guys from the The Japanese tool study group; had the chance to adjust a plane for then, I am a big fan of tools than can be fixed with the gentle application of a hammer. Demonstrating just a few yards away was Deneb Puchalski from Lie-Nielsen Toolworks; was very interesting listening to his take on sharpening; a mix of diamond and traditional waterstones were his preferred method. Deneb ordered an Axe from me over 6 months ago now and like many people has had to wait whilst I work through the list; however the chance presented itself for him to have a hand in making  his own axe.  Rob stepped aside for the last stage and Deneb struck for me.

IMG_6737

You can see that Deneb opted for the new, shorter sledge also the lower anvil is a mixed success; better for the striker but it does leave me a bit bent over. In the workshop a high anvil and a pallet on the strikers side balances things out much better.

We also had a chance to sort out the final tweaks to an order of spoon carving sets that Lie Nielson have placed  for the courses Peter Follansbee is teaching for them in May. I just had time to get the sets ready and sent out to them.

IMG_6845


I am very proud to have worked with them on this and other orders; it is fantastic to supply such a prestigious company. Although they are used to much larger quantities than I am able to supply they understand very well my productions methods and are keen for me not to compromise quality for quantity. However the range of my tools that they would like to stock is ever growing,  I am in the process of signing another 6 year lease on my workshop, some changes will soon be made which should help me to expand production in the future.


New Season of shows – Yandles Spring show

First demonstration of the year at Yandles Spring show this Friday and Saturday. I am amazed at how far I have come, this show last year was the first time I had forged an axe in front of a crowd, it took the entire day,  hopefully we should be a bit more fluent this weekend! I have made a few tweaks that should help things along further:

New season preparations 1


Firstly I have been trialling a different sledge hammer design, virtually everyone that has used my larger sledges has ended up with bruised hands, it puzzled me at first as I have never encountered bruising when using single handed hammers. Working by myself I have had very little experience with sledges; eventually it struck me that mostly my strikers were holding the sledge with their hands far apart:

New season preparations 2

This is understandable, the hammer is heavy and there is more control and accuracy when holding like this; however when a (single)  hand hammer rebounds the head goes up but the centre of rotation is in the palm of the hand so little shock is transmitted to the hand through the handle. With the hold shown above the the centre of rotation is between both hands, so when the head rebounds the hand nearest the head receives a big shock from the handle in the web between thumb and forefinger.   The back hand doesn’t suffer in the same way as the handle is moving away from the hand at this point.  New season preparations 3

If you look at the new sledge, the handle is so short that it feels more natural to have both hands together, the centre of rotation is between both hands, but as they are so close to this point the shock is reduced to almost nothing. It looks odd but has worked well in the workshop. However I think it will look a bit like a toy in the hands of Rob, my regular striker at shows, I will find out his verdict in a couple of days!  This is of course a compromise, the bigger sledges will hit harder but really need to be held with hands together to reduce the shock, with practice this is possible but it is difficult to do this accurately, when I am teaching courses the shorter style of hammer looks to be the way forward.

The second thing I have done is to reduce the height of my anvil block, in the workshop during courses I have been putting a pallet down but  it seemed sensible to have a dedicated axe forging block. I moved both of the steel bands down and we marked out for the cut. The Oak had many splits in it that had filled with  forge scale over the last decade, the chainsaw was blunted in seconds but we eventually managed to cut around 4″ off it.  I used a  chisel I made around 15 years ago to bevel the edges on the block; the edge held very well considering the rough time it had. This set me thinking, with the knowledge I have now all the heat treatment was wrong; the blade was laminated but I didn’t follow the rigorous thermal cycling I now use to relax the steel after the stresses of forgewelding, I quenched at the wrong temperature, too cool, although this was judged by eye, the quench medium was wrong, water  rather than oil and finally I tempered at the wrong temperature 100 degrees centigrade, boilling water. I have heard it stated that this steel should be tempered at 250c  when used on wood.

Yet despite all this the edge holds up well; this wasn’t all  just accident I had found by trail and error that this recipe worked . What I think happened was this: As I was relatively inexperienced at forging I finished the blade relatively tentatively at a series of low heats, this mimicked the thermal cycling that I now do. I had the hardening temperature too low, but quenching in water gives a more aggressive quench so this sort of balanced out, if I had quenched in water at the correct temperature the blade would have cracked or at  least warped. The resulting quench didn’t give a very hard blade so lower tempering temperature was needed. I would still do things differently now but you can learn a lot more from trial and error, I would recommend this route rather than reading up obsessively on Heat Treatment.

Just after taking this photo I was asked to run a course making spoon blades with handtools and no complicated heat treatment, not my usual thing but I made one as a test piece; this was the result, everything done by eye or hand and I managed to replicate the edge geometry that I find so important in my production blades. It was a pleasant experience, filing and forging is much more rewarding than grinding.

Filed blade 2


Powered by WordPress. Designed by Woo Themes