Archive | Tools

Sharpening Video

After many abortive attempts I have finally got a video together explaining the geometry on my curved blades, the thinking behind it and how best to sharpen them. I would like to say a big thanks to Alex for filming and then editing this, if you watch to the very end you will see the blooper reel that chronicles the mountain he had to climb.

I realise that it is a long film, but there was actually a lot to say; Alex did cut it down to make a shorter version that captures all the essential sharpening information but the longer one is much better in my opinion. I have also put together a sharpening kit that includes everything that is used in the video.


Ordering Information- Update

The first trial of the back or pre-order system is underway- I have taken what I estimate to be a month worth of orders and will be starting on them first thing tomorrow.  If you had notification but got on to the site and found no stock then don’t worry- we will be using your place on the wait list to build a new linear one. Sign up to my blog to be kept informed of updates as we have them.


Ordering Information

As I have intimated for some time the wait list system on the site has not worked very well. As has been pointed out, it didn’t actually function a waiting list, but the plug-in in question labelled itself as such and it was not possible to change it to ’email notification system’ which might have helped matters.

As an experiment I am going to allow customers to pre ( back) -order blades, it will be possible to order blades that are not actually in stock. This should stop the phenomenon of customers making multiple purchases to get all the blades they want, which benefits nobody but the postal service. I will take what I perceive to be a months worth of orders then remove the back-order option. If this first trial runs successfully then the plan is to use the wait lists that people are on as a way to allow further limited series of pre orders to be taken. Please be aware that if you do order by this system there may be a significant wait before your receive your items.

Easy for me to type this, but from an IT point of view I am told it is not straight forward at all. Hence I want to run a test to see if it is worth ploughing resources into this. It is not clear what will happen when the out of stock purchase option is activated. Maybe everyone on the wait list will get an email saying that their tool is back in stock ( which isn’t really true) and the site will again be overloaded. Hopefully not, but if this is the case the wait lists are already archived and there is no need to rejoin.

I plan to have this up and running in the next couple of days but am not going to put a time up as most of the current frustrations seem to have been caused by too many customers after too few blades, all at the same time.

Kuksas and Sharpening.

Forging tools as fast and hopefully as well as I can, but still not managing to keep up does get rather wearing, and I have been getting increasingly jaded with the situation. Despite the fact that I am producing tools in larger numbers than ever before they are still hard for people to come by due to the spiralling demand. We are still trying to work on a way to queue orders on the website in a fair manner, it is not as simple as it seemed. If I have to do this manually it will take valuable time that could be spent addressing the real issue in hand which is making tools. I actually did a small run of axes a couple of months ago, I sold these individually rather than through the site.  It took an average of eight emails to complete each sale. If you look at the last batch of hooks I have forged you can see why I need to be able to sell them via the site in an automated manner.

wp_20170203_15_04_38_pro


Last week though Alex and Nicky came over to run two days of his hugely popular Kuksa carving course. It was wonderful to see the workshop transformed into a classroom and have it filled with people, it is rare for me to have visitors to the forge, and it really lifted my spirits.

Tools laid out

_dsc19191

Calm before the storm

_dsc19131

A very different atmosphere in the forge over the weekend

_dsc23171


_dsc21331


_dsc23571


Some great nests made by a first time swan neck user

_dsc21661


Alex at work

_dsc22111

_dsc23351

Two highly successful courses, I managed to squeeze in making a  hazel gate over the weekend, again a pleasant change for me, all my carving in the workshop is in  bone dry ash. It is a joy to carve something green.

_dsc23881

We spent an evening winding down after the courses gilding treen- I had been searching for some batteries in the workshop and unearthed a book and a half of 23.75 carat gold leaf. A week ago- I used to gild some of my decorative forged work but had never tried it on wood before, as you can see the results were stunning. We also had some time testing a pair of prototype axes I made over Christmas, more on those another time as it got rather involved but it is invaluable for me to spend time bouncing ideas of someone as experienced as Alex.

_dsc23951

It was intriguing to watch how different students got on with my tools. Some amazing shavings were made by students that had never used one before. I learnt a long time ago to take note of the shavings that a carver makes. In the end anyone can finish a piece by taking tiny little shavings. What impresses me ( as a toolmaker )  is the bigger chips from the roughing out process. Most informative was how the less experienced students were more likely to struggle with tools that had lost a degree of sharpness. This subtle degradation of the edge wasn’t always that obvious and Alex could carve a lot longer than anyone else with a tool that needed touching up. There were also a few students that brought ‘foreign’ tools in for me to sharpen. It really brought it home to me how important it is for my customers to be able to keep their blades as sharp as when they left my workshop.

I have been unsure about explaining my sharpening  processes to a wider audience for quite some time now. For one there is the horror of having to face the camera. The other issue though has been how much I want to say about my tools. When I started forging blades 6 years ago there was never any need to have a makers mark, my blades were instantly recognisable and virtually nobody was selling forged woodcarving blades. They have of course been refined over the years and certain aspects of my designs became signature features, such as the tramlines on my spoon blades. There have been a few attempts at replicating them over the years but some recent copies are pretty close. I can see the differences, some aesthetic some not, but felt I could say nothing. If I pointed out the differences then the next versions would be closer.

However putting this rather frustrating aspect of business aside it seems like it is time to explain how to sharpen my blades, and to do that it is necessary to explain the edge geometry that I use. So Alex, being a highly accomplished film-maker shot a video- This was his second attempt and actually in total my fourth go at being filmed. We just about got there in the end but I really don’t envy his job in editing it to come out with something coherent, It looks like there will be a full version with edge theory and a shorter one just focussed on the sharpening.

In the meantime Alex made this teaser video, he actually put it all together on the spot picking up my daughter’s much abused guitar – it had got rather damp as it had spent the ‘summer’ outside under our shelter. We felt bad about this so had left it dry by the wood stove.


Perfection

“Gentlemen, we will chase perfection, and we will chase it relentlessly, knowing all the while we can never attain it. But along the way, we shall catch excellence.”

Vince Lombardi Jr.

I heard this quote from a very talented local carver. This crystallized my ponderings on perfection and why I had disliked it so viscerally when applied to craft. If you believe the last thing you made is perfect, then that’s it. Your work is done and there is nowhere further to go. The flip side though is that it can be hard not to see fault in everything you do and get overwhelmed by it; often in the past I have driven home thoroughly disheartened by a tiny aspect of a tool that to my eye ruined it completely. And the next morning struggled to find this terrible flaw.

I like this quote, find it reassuring, thank you Grant.

Last post showed the axe I forged on a course, I was really pleased with it; however when I came to try it out I felt that the handle was too long, using it at full length made it feel a bit floaty and imprecise, as I suggested at the time it is a bit light for its size and a longer handle didn’t really cure this. So I used it to  carve another, by the time I had finished the new handle I largely come to grips with the old one, but this one feels right immediately, not after 10 minutes use so it is a step forward.

I have also included a picture of my hammer handle one week in; I took it to Barns where I was running an axe making course, really impressive set of axes came out this time, hopefully I will get some images of them to share soon. I had a fair go with it then and then and did a short run of  axes back at my workshop; managed to drop a red-hot head on the handle and burn a notch in right at the weakest point, the handle isn’t really right on this either; it feels great when I hold it at full length and I get the impression that vibrations are not transmitted up a thinner handle. However at times I really like to choke up on a hammer and when I do this I am gripping the a section that is too narrow for my hand and this can cause real problems. I’ll probably keep the handle for another hammer and make a new one. You can see why I love ash though, it starts off looking very bland but very quickly the porus grain fills and it takes on a whole new character, there is a difficult teenage period when the ash grain is neither clean or fully filled and just looks dirty but with hands like mine it doesn’t take that long.


Axe and hammer a week later


And the new heads, a few subtle tweaks and variations in the designs, a more boldly incised pattern and new, hopefully superior steel, it forges nicely and as far all the readings tell  me the heat treat has worked well, but I won’t know for certain until I put a handle on one and see how the edge holds up in use. But which one? always in the past when I make a batch there is one that to my eye stands above the others, this batch I am still undecided, really I want to try them all.


First three

Axes and Adzes, Again.

I had a great day last week with Richard and Jules Heath, they came to forge axes. It has been a while since I have taught axe making in my workshop, concentrating on larger groups at the Green wood guild in London, and a new adze course at Westonbirt, see my courses page for details. This time they were aiming to make a head each in a day, this seemed easy enough so I decided to forge an axe alongside them. On a course I will typically start off a head to give everyone an idea of what we are doing but rarely finish them off; and if I do try they often end up going wrong as I am actually concentrating on my students 6 axes rather than my own.

This time though I decided to make a much more extreme version of my carving axes. The blank was around 2 oz heavier but the techniques for forming the eye, lug and throat of the axe were identical. My blank was on the right.

blanks

Next we marked out where the eye will be slit; this is done cold. I have been in two minds about this for a long time, it is much more accurate to mark out cold but I do think that it is shame that the first forceful blows on the steel of the day are not done under heat. However accuracy is so important at this stage that it overides my aesthetic concerns.

marking out

Finally into the forge.

first heat

And slitting the eye, Jules was concerned that his tennis elbow would preclude his ability to make an axe, but as you can see from the picture both of his hands are taken up, I am striking with the sledge but Jules is definately in control of the preceedings.

eye slitting

When it came to forging out the my axe I tended to use the powerhammer to speed things along. I am drawing out the lugs on the eye.

cheating on the powerhammer

Back to the sledge and drawing out the blade on Richard’s axe.

flareing the blade

At this stage we run out of pictures and jump to their finished axes, I carried on completed forging on mine whilst they were doing the heat treat and some of the grinding.

Here we have Richards head.

Richards axe

And Jules’.

jules aze

I great day that I throughly enjoyed, Jules and Richard are well known green wood workers and I always find that these skills transfer well to forge work. It was really liberating making an axe alongside them, I decided to have a play and see how far I could draw out the edge. The past year has been focused soley on production and I enjoyed making this so much that the next day I went on to make a couple of rounding hammers, I had used tools like this to finely control the flow of the steel to get the maximum edge length from a relatively small piece of steel; it ended up a fraction over 7.5″ and  1 1/2 lb ( 675g)

When I came to make the handle I fitted one of my temporay handles using a long wedge and carved the handle for the axe head with the axe head, wordplays like that in action please me immensely. On a more practical level whilst it would have been quicker roughing out with a drawknife (or bandsaw and linisher if I was really willing to sell my soul.)  it was really useful to try out the axe and see what I liked about it and what needed changing, the handle I had put on turned out to be too curved so I altered my design to account for this, also the head felt a bit light considering how much potential edge could be used to hew with so I put a longer handle to allow it to feel more powerful if need be. I only made the head as an exercise to see how much edge I could tease out of the blank but ended up really liking it however I still feel that anything over 5 1/2″ inches on a carving axe is overkill.

handle underway


However there are certain features that I like about this axe that will subtley show themselves in future, less extreme runs that I produce. The handles on the hammers I made very thin, I wanted to see if this would help reduce the shock back up my arm when working harder grades of steel, will be interesting to see how they hold up; they certainly won’t look this white for long. I doubt I will ever put them into the mix of my teaching hammers as they would easly break with a misshit. Also I tend to purposely make teaching tooling with a bit less care than this; it is not that I want my students to use inferior tools (and most of the differences I am talking about are asethetic not functional) , just that I know that the tools are going to get a fair beating and I find it very hard to let go of a tool that I have lavished alot of attention over. It would not be fair for me to be wincing every time a student slightly mishits a tool and marks it so I make sets up that are a bit more robust and rustic than these.

axe finished

Axes, adzes and reamers

It feels like most days I receive emails asking when I will start making axes again, finally I have some news. Firstly though a quick update, two months ago I crushed my thumb in some machinary and it has been very slow to heal, I am still having to bind it up with duct tape at work and it has slowed me down considerably. It was quickly apparant that production work would be too taxing so have been concentrating on making, then testing new tooling and refining a few designs, some new, some old. I have also finished off an order for Lie-Nielsen, tools for another course that Peter Follansbee is teaching. This has meant that my website has run dry and wait lists are very long but I am back into production now and stock should filter through to the site in a couple of days.

Some of my tooling has been aimed at refining the way I forge axes, originally the idea was that I could make them quicker, but as soon as I tried them out it became apparent that I can now forge more accurately and cleaner than ever before, I could rush through and do them faster but I have decided not to take this route, the end result is that axes aren’t actually coming out any quicker but they are the best I have ever made, I am also testing better steels so the edge holding is going be enhanced. I decided to reinforce the point that these aren’t bashed out at speed by putting some subtle decoration on them. So far I have made a couple with handles and masks and another pair as heads only. The finished ones are quite extreme, rather closed eyes necessitated very curvy handles, I got a bit carried away on the paler one and ended up putting more of an adze shaped knob on, but it feels good in use. The wedges have been left long but I would expect to trim then down after a few weeks use.  The next pair of heads were more conventional and will be fine on straighter handles. It was great to be forging axes again, and a joy not to have my eye on the clock all the time which often happens with pure production runs.

pairoaxes


loadsaaxes


One thing I have found with axes is that they are pretty forgiving when it comes to handles, after a few minutes you can get used to quite different handle geometries. It should be said though that I go to a lot of trouble to make sure all my own axes swing the same, this way I can swap straight from one to another without any break-in period needed.

Adzes however are very different, get the handle to edge geometry just a few degrees out and they really won’t work well. This was brought home to me a while back when I steepened an edge that kept rolling, when I got back to the bowl I was working on it was immediately apparent that the edge now held, but the geometry was wrong.

Paul Hayden runs chair making courses at Westonbirt and over the years I have known him he has bemoaned the fact that it has become more dificult then impossible to get an adze out of the box that is suitable for hollowing chair seats. His brief was quite specific and I came up with a design that seems to tick all his boxes, except to my eye the aesthetic, but that should progress in later versions. These carve beautifully on a  fairly short, straight handle, used two handed. Very different to the bowl adzes I am used to, the inside bevel though is not ideal, as it is not so easy to sharpen. Next versions will explore if an external bevel can carve as smoothly.

Finally I have made the tooling for these reamers for Barn, they seem to work well but when I go down to London to for an Axe course this weekend we will spend some time testing and refining grinds.

adzesnreamers

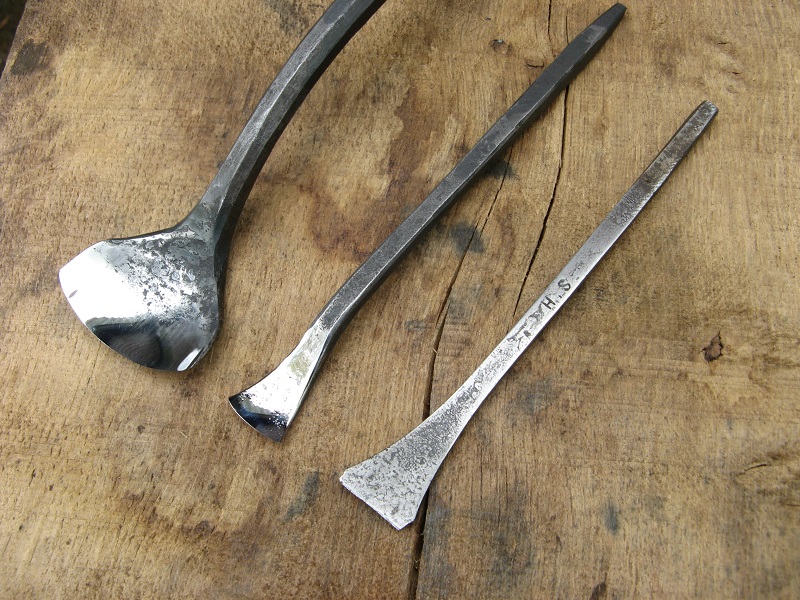
Then, as I said a short run of spoon carving tools to go to the States, handle making underway.

woodworkin

And the finised batch, with the two pattern handle tools in the foreground

allfinished

My next priority is to get fully back into production to stock this site; however as time presents itstelf I will be doing some limited runs of axes and later adzes, these will be done on my terms, so no special orders will be taken. This current batch is already spoken for and when I have decided how I will be sellling later batches and finalised specs I will update again here. So, progress of sorts!


Summer Plans


This Spring I decided to have a quieter summer, a chance to spend more time with my Family, so no bookings were taken for any of my usual Summer shows, and it felt good to know I wouldn’t be spending the next few months on the road.  Then an email from the States arrived inviting me to Maine to teach a course and put on an axe making demonstration at Lie Nielsen Toolworks. I went over with my daughter Jenn for the first two weeks in July. I would have put a blog post up about this but when we got home we promptly lost the memory card with all our photos on. We realised that a lot of  what I had done had been duplicated, I forged an axe with Roy Underhill and images of that popped up all over the internet, but there were a lot of images that I thought would never been seen again so I was so pleased when the card finally turned up a few days ago.

Two Georges

I spent most of my time working in this shop when I was at Lie Nielsen- these two guys, referred to by everyone as the Georges were great, George Stevens on the right and Old  (!) George on the left. This was the prototyping workshop, not production and was filled with wonderful old machines, lots of cast iron, hand cranks and exposed pulleys and gears. They were extremely welcoming and helpful, I was concerned as to how they would respond to me turning up and making lots of noise and mess in their workshop. Old George helped me with some cutting and welding and at first was a bit bemused by my seeming inability to measure anything – ‘ I need 10, or 12 at about…. this long ( wave of my hands)’ but after a week took in in his stride.


PG


Another slightly stilted photo of me, this time with Peter Galbert, behind us is the smoking detritus of a Lobster bake, lobsters and clams steamed in seaweed over charcoal. A fabulous evening at the open house put on by Tom Lie Nielsen, more about that in another post. It was so informative meeting Peter, we talked tools and bevel angles and immediately clicked; it was great to speak to someone with the same mindset as to how tools work. When I finally got back into my workshop I applied some of the theory that he had described in the use of his Travisher to a Drawknifelike design I have been toying with for the last two years, I had to re-vist my A- Level physics and draw out forces diagrams but all was clear and a couple of bends with the Oxy Propane torch and the tool was transformed. And yet it flies directly in the face of what we discussed about Drawknife theory in Maine! I got a copy of his book Chairmaker’s Notebook and I highly recommend it, doubt I will ever make a chair, but now want to.


A couple of weeks after we returned I had another email from Deneb at  Lie Nielsen. They needed, at pretty short notice, tooling for courses that Peter Follansbee and Jogge Sundqvist were teaching. These orders will take a lot of time, but it seemed churlish to refuse, I have met Jogge a few times and know that he uses my tools, and Peter has been very vocal in his praise for my work and was keen to have my gouges, twca cams and adzes for his bowl carving course, all these tools are handled. I make all my handles from green wood and it has been nice to spend some time in my workshop with clean hands.

GWW


I have a good stock pile of straight green ash and although it would be quicker to buy in copy lathe turned handles that is not the way I want to work. It also gives me a chance to use my tools in a production setting which tells me a lot about edge holding and handle design and comfort. By chance I had lent most of my tools to a friend and the only axe I had was the one pictured, it was kept really for historical reasons as my designs have moved on from this early example, but I was really pleased to get re acquainted with it.  I would normally let them dry naturally before a final fit and finish, but time is extremely short and currently the micro wave is working at hard as I type this; every two minutes the machine pings and my youngest shouts out ‘Dad! Dinners ready!’ in a few weeks she might tire of this joke, but currently it is still fresh.


Dinners Ready


In light of this and other commitments I have- A course at Barns, a run of three shows in September and a Family holiday squeezed in I have taken the decision to shut my online shop for a while, it is no secret that I have difficulty keeping up with stock at the best of times but having a completely empty shop or turning up to shows with no stock to sell makes no sense at all.  I have, I suppose technically left it open so you can view what is on it but have reduced the stock levels to zero, I did also put all the prices to zero to make it obvious that no purchase could be made but the site then said ‘ This item is free!’ so I reset everything to £999 as a further deterrent to people trying to make a purchase.  On a positive note not having the shop open has brought home to us just how much time is spent packing and answering emails. Hopefully I plan on using this time to put up some more blog posts:  My trip to the States, some thoughts on my current working practices and ethics, and plans for the future, including axes and adzes.

New Stock of Carving tools

New old stock

With the last outdoor show of the season done and stock on my site built up  I was able to make some tentative runs on the tools shown above , nothing really new but a few little tweaks and some older designs that customers have been consistently asking to be put back in production, hopefully I will be able to keep up, although I expect the run up to Christmas to be testing.

I spent some time today photographing these carving tools for adding to the website, something I find a real chore. They have just gone up on the site, it really has been a hectic summer, I even uncovered a small cache of skew chisels made in May that were never uploaded.

Planning on forging axes and adzes this coming week, a couple of larger ones for me to try out on some Poplar that looks like it could make superb bowls, then a concerted effort to make inroads into my axe and adze order list.

Poplar

Chisels and Gouges

About 18 months ago I read a great article in Woodcarving Magazine, Michael Painter was discussing the design of tracery chisels, they looked interesting and I learnt a lot about their design . Using the principles he described I came up with my swan necked bowl gouges. They are a tool I am especially proud of as they are so different to the bowl gouges that other makers offer. One of the reasons I called them Swan necked is that I find these tools graceful and current alternatives are known as doglegs, which, well, aren’t.

I met Michael at a show earlier in the year and started describing the bowl gouges I had made; he firmly corrected me saying they were chisels not gouges  ( my view is that if I made the tool I can call it what I want, but thought it better to bite my tongue. )   he looked skeptical but I produced said tool and he was quite impressed, showing me the original tracery chisel that I had seen in the article he wrote. I took some measurements and we also discussed making some fishtail chisels. I enjoy trying something new and this was the result.

fishtail and tracery 1

The day I finished this set I had a phone call from a customer that had bought a bowl gouge from me asking  if I could make fishtail chisels, he sent an old one down that he had snapped the corners off- not all old tools were made from from perfectly tempered steel obviously.

When it arrived the next day it was interesting to compare  it to my new tracery chisel and the greenwood swan neck.

bowl gouge origins 2

They may look very different but the techniques to make them were identical,  shape and scale varied but it showed me how closely related the different branches of carving actually are.

I have been wanting to make a one handed version of my gouges, the same wide blade and sweep but more compact neck and handle. Here is the first attempt, it still needs more testing and tweaking but first impressions are good. But the part that really makes me happy is that I get it name it the Cygnet.

gouge

Powered by WordPress. Designed by Woo Themes